http://skydays.tistory.com/194#trackback1775469
CentOS 5.4에서 RADIUS 서버
설치하기
RADIUS 서버(인증 서버)를 구축하기 위해서는 다음과 같은 파일이
필요하다
◎
files
● freeradius-server-2.1.10.tar.gz
●
openssl-1.0.0c.tar.gz
●
freeradius-server-2.1.10_eap-aka_patch.diff
(aka 인증 패치)
◎ OpenSSL 설치
OpenSSL은 리눅스 설치시 함께 설치되며 보통 Binary 형태로 설치 된 경우가 많기에
그냥 새롭게 설치해준다.(이전에 설치한 binary RPM은 삭제하지 않고 소스를 설치하는 것이
좋다)
Openssl 압축 해제 및
설치
# tar vxzf
openssl-1.0.0c.tar.gz
# ./config shared
--prefix=/usr/local/opensssl
# make
# make
install
◎ Freeradius 설치
Openssl 압축 해제 및
설치
# tar vxzf
freeradius-server-2.1.10.tar.gz
# ./configure
--with-openssl-includes=/usr/local/openssl/include \
--with-openssl-libraries=/usr/local/openssl/lib
\
--prefix=/usr/local
◎ 인증서 만들기
인증서를 만드는 이유는 802.1x 프레임워크에서 인증 알고리즘으로 EAP-TLS, PEAP를
사용하기 위함이다. EAP-TLS,
PEAP 모두 양방향 인증 방식으로 Supplicant 는 Authentication Server 를 인증하고
Supplicant는 Authentication Server 를 인증한다. EAP-TLS 의 경우는 양쪽 다 인증서가
필요하다. 하지만 AP를 사용할때마다
인증서를
준비해야
하는
Supplicant의
불편을
덜어주고자
나온것이 PEAP
이다.
먼저 인증서를 만들기 위해서는 인증서 생성시 필요한 기본 정보들을 등록해야한다. 설치된 경로로
이동한다.
# cd
/usr/local/etc/raddb/certs/
아래의 경로에는 다음과 같은 파일들이 있을 것이다.
[root@localhost:/usr/local/etc/raddb/certs]$
ls
Makefile README
bootstrap* ca.cnf
client.cnf server.cnf xpextensions
위 파일에서 확장자가 cnf 인것을 수정한다.
수정 파일 총 3개(ca.cnf client.cnf server.cnf)를 변경하면 된다.
아래는 예시이다.
countryName =
KR
stateOrProvinceName =
KOREA
localityName = Seoul
organizationName =
MMC Technology
emailAddress =
XXX@mmctech.com
commonName = "MMC"
젤 먼저 countryName은 2개의 문자로 구성되어지고 그다음 나온
stateOrProvinceName 에서 풀로 적어준다. localityName은 지역명을 간단히 적고
나머지는 회사명/이메일 등을 넣으면
된다.
그외 input_password와 output_password가 있는데 인증서 설치시 필요한
것이니, 변경하면 기억해두도록하자.
input_password = whatever
output_password =
whatever
이제 인증서를 생성해야하는데 기본적으로 client쪽 인증서가 생성되지 않는다 따라서,
Makefile에 아래와 같이 변경한다.
.PHONY:
all
- all: index.txt serial dh random server
ca
+
all: index.txt serial dh random
server ca client
그런 다음 인증서를
생성한다.
[root@localhost:/usr/local/etc/raddb/certs]$
make
그러면 다음과
같이 파일들이 생성 될것이다
|
[root@localhost:/usr/local/etc/raddb/certs]$
ls 01.pem README ca.der
client.cnf client.key dh
index.txt.attr.old random
server.cnf server.key
xpextensions 02.pem bootstrap* ca.key
client.crt client.p12 index.txt
index.txt.old serial
server.crt
server.p12 Makefile ca.cnf ca.pem
client.csr client.pem index.txt.attr
jhchoi@mmctech.com.pem serial.old
server.csr
server.pem |
인증서버
설정
다음으로 상위
디렉토리로 가서 기본 인증 방식을 tls로 변경한다.
[root@localhost:/usr/local/etc/raddb/certs]$ cd
..
[root@localhost:/usr/local/etc/raddb]$ vi
eap.conf
|
- default_eap_type =
md5 + default_eap_type =
tls |
AP 등록 및 Client User
등록
” Clients.conf “ 파일에 아래와 같이
추가한다.
[root@localhost:/usr/local/etc/raddb]$ vi
clients.conf
|
client
172.16.0.0/16 { secret = test #(AP Shared
Secret) shortname = MW-2070AP #(AP 를 관리하기 위한
이름부여) } |
다음은 인증해줄 사용자(Supplicant)들을 등록하는 과정이다. 같은 디렉토리에 users 파일이 그것이다. 이 파일에는 인증과정을 거쳐 Authenticator(AccessPoint) 를 사용할 수 있는 사용자(Supplicant) 를 등록하면 되는데 이때 사용자 아이디는 Supplicant 인증서를 만들때 입력한 commonName 이다.
[root@localhost:/usr/local/etc/raddb]$ vi
users
|
MMC User-Password
:= "test" |
이제 RADIUS 서버를 실행시키면 된다.
|
LD_LIBRARY_PATH=/usr/local/openssl/lib /usr/local/sbin/radiusd
-X |
위의 LD어쩌고 저쩌고는 Radius 서버 데몬을 실행하기 위한 공유 라이브러리 경로를 지정하는 것이다 매번 지정하기 귀찮으니까 프로파일에 추가하거나 스크립터를 만드는 것이 편하다. 아래는 스크립터를 만드는 방법이다.
[root@localhost:/usr/local/etc/raddb]$ vi
/usr/local/sbin/run-radius
|
#!/bin/sh
-x LD_LIBRARY_PATH=/usr/local/openssl/lib LD_PRELOAD=/usr/local/openssl/lib/libcrypto.so export LD_LIBRARY_PATH
LD_PRELOAD /usr/local/sbin/radiusd
$@ |
[root@localhost:/usr/local/etc/raddb]$ chmod 755
/usr/local/sbin/run-radius
[root@localhost:/usr/local/etc/raddb]$ run-radius
-X
Windows 2000/XP 환경설정 -
Client
가장 먼저
할것은 인증 서버에서 만든 Supplicant 인증서를 PC 로 다운받아 인증서를
설치해야 한다. 그러기 위해서
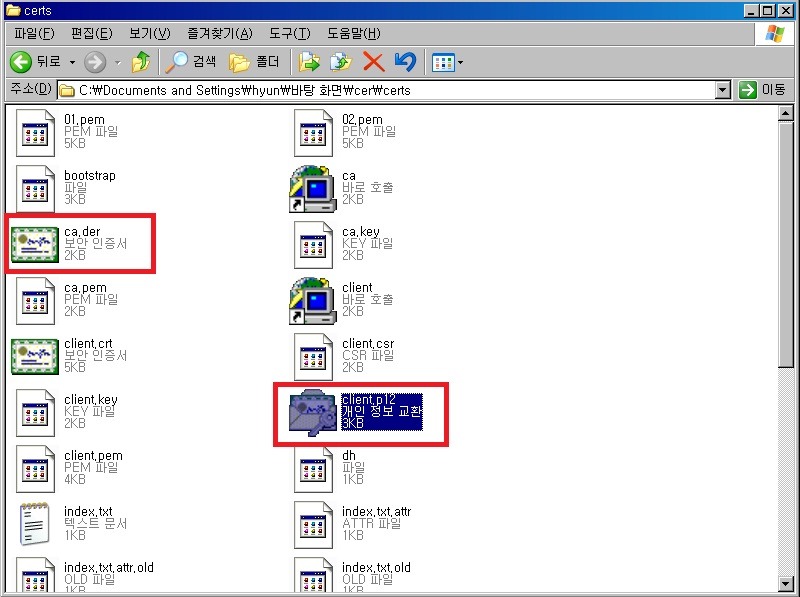
ca.der, client.p12 를 Supplicant 로 사용되는 일반 PC 에 다운받아 설치하면
된다. client.p12 은 파일명 그대로
client certificate 즉 Supplicant 인증서를 말하며. ca.der의 용도는 root CA 인증서로
이 Supplicant 인증서를 signature 한
인증서이다.

먼저 root CA
인증서인 root.der 을 설치한다.
PC 로 다운받은 ca.der 을
더블클릭한다. 그러면 인증서 정보가 첫 화면에 보이는데 여기서
"발급자" 항목을 보면
이전에 root CA 인증서 만들때 사용한 commonName
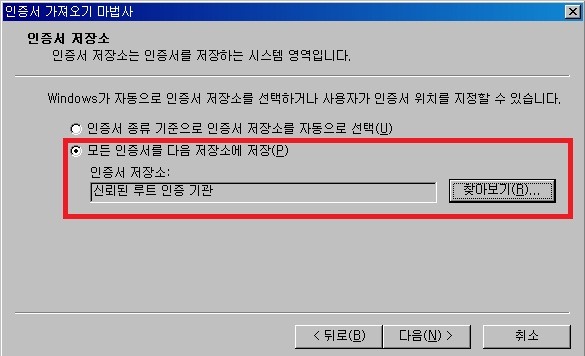
이 보일것이다. 그 화면에서 "인증서 설치" 버튼을 클릭한다. "인증서 저장소"
단계에서 "모든 인증서를 다음 저장소에 저장"을 선택하고 "찾아보기" 버튼을 클릭하여 나타난 목록에서 "신뢰된 루트 인증 기관"을 선택하고 확인을 눌러 설치 작업을 마친다.

이번에는 Supplicant
인증서인client.p12 를 설치합니다. 마찬가지로
client.p12 을 더블클릭하여 암호 화면까지 이동한다. "암호" 항목에 인증서 만들떄 사용한 암호값인 whatever
를 입력하고 다음으로 넘어갑니다.. 이번에도
"인증서 저장소" 화면이 나타나는데 이때는 "인증서 종류 기준으로 인증서 저장소를 자동으로 선택"
을 선택하여 완료한다.
이로써, Freeradius
를 구동하기 위한,
모든 설정이 끝났습니다
AKA인증 관련 내용은 트래백을 참고하세요


