


Using TLS with OpenSIPS: Why do we need it and how is it configured? While support for TLS existed in version 1, the configuration changed significantly in version 2. This article briefly covers the new v2 setup.
The role of TLS in VoIP calls
Sadly, we are all learning fast that unencrypted communication over the Internet is risky. You will no doubt be familiar with the use of https which provides secure, encrypted web browser sessions for things like online banking and e-shopping. The underlying mechanism for this is TLS (Transport Layer Security). The same mechanism is also available for SIP thereby allowing VoIP calls to be set up over a secure communication channel.
There are obvious commercial reasons for an ITSP to be able to offer this as a premium service or just as an inducement for customers to choose them rather than a rival who cannot offer it. In addition, TLS is likely to work better for mobile SIP clients because it is based on TCP rather than UDP so it is useful to have it as an option to allow support of the widest possible range of User Agent devices. Furthermore, it may be obligatory to use TLS for some applications such as where credit card numbers are being entered over the phone.
It is important to appreciate that SIP over TLS only provides encryption of the call’s setup messages and does not provide encryption of the media streams. If you require the media to be encrypted, then it is necessary to use SRTP rather than RTP. Usually, where media encryption is required, it also necessary to use TLS for the SIP messages to ensure that important meta-data cannot be intercepted during call setup. Configuration for SRTP is likely to be required on the end-points (FreeSwitch, Asterisk, etc) behind your OpenSIPS proxy and so is not discussed here.
Configuring OpenSIPS v2.2.x to support TLS communication
If you installed OpenSIPS using a source tarball, it is possible some of the required modules will not have been built. This is because they are treated as “not required” by default. You can check if they are present by looking in the <lib>/opensips/modules directory and looking for files proto_tls.so and tls_mgm.so, where <lib> is likely to be one of /lib or /lib64 or /usr/lib or /usr/lib64. If those files are not present alongside all the other “.so” files, then it will be necessary to rebuild from source, but first go into the make menuconfig forms and select ‘Configure Compile Options’ then ‘Configure Excluded Modules’ then select the two previously excluded modules; save; rebuild.
Looking at the opensips.cfg file, using version 2.2.3, you will need to include a listen statement a bit like this:
listen=tls:10.34.56.78:5061
OpenSIPS can listen on multiple ports and multiple interfaces using various protocols. So it is perfectly acceptable to have more than one listen statement and to have, for example, port 5060 listening for UDP connections alongside port 5061 listening for TLS.
Load the following modules, in addition to the usual ones:
loadmodule "tls_mgm.so"
loadmodule "proto_tls.so"
…and configure various parameters in the tls_mgm module using modparam statements, including:
modparam("tls_mgm", "tls_method", "SSLv23")        # This option seems to work nicely in most cases
modparam("tls_mgm", "certificate", "/etc/opensips/tls/mycerts/mycertfile.pem")  # Path to your server certificate file
modparam("tls_mgm", "private_key", "/etc/opensips/tls/mycerts/mykeyfile.pem")   # The path to your key certificate file
I was using self-signed certificates (.pem files), having previously set up my own Certificate Authority. If you are trying something similar, make sure you override SHA-1 encryption which openssl is likely to set as the default (it is no longer considered secure) and at least use SHA256. I did this by editing my openssl.cnf file and changing this line to
default_md = sha256
(previously it said default_md=md5)
You can, I believe, also set the desired encryption as a command line argument when you run openssl from the command line.
For my test rig, I added a modparam statement to define the “ca_list” parameter. This defines the path to a file containing the CA’s certificate or a certificate chain – again this was a .pem file. You may need this for commercially issued certs too.
My settings for certificate verification requirements were fairly easy-going, as follows:
modparam("tls_mgm", "verify_cert", "1")
modparam("tls_mgm", "require_cert", "0")
…and because I was using self-signed certificates it was also necessary to disable the stricter certificate checks on the client device too.
There is nothing special you do in the route blocks, but if you are setting up OpenSIPS as a Registrar server, a useful tip is to set the global parameter “tcp_connection_lifetime” to a value that is just larger than the maximum registration expire time you expect to see. Without this, the TLS connection established during registration is likely to be dropped before the next re-register happens. That, in turn, is likely to cause problems with requests sent to a UA behind NAT or behind a firewall (most are) meaning that the UA can make calls but cannot always receive them.
Here’s another small detail to watch out for, especially during testing: When a device has registered via TCP or TLS, the established network-level connection needs to remain active. However, every time you re-start the OpenSIPS service on your server it will break the network connection. This doesn’t happen with UDP. You should therefore try to avoid re-starting the service too many times when testing because it could send you up a blind alley regarding potential bugs and problems that would simply not happen if the service was left running uninterrupted.
Configuring the client device
There are too many client devices available for it to be possible to describe how they are all configured. However, I can offer some guidance based on a few specific examples and it will almost certainly be applicable to many others. My testing was done using self-signed certificates for the OpenSIPS server. This has the advantage of avoiding fees, but the disadvantage that your client devices will have very little trust for the server certificate. Sometimes, in this situation, you can disable server cert verification on the client app or you can install your own CA certificate on the client either as a generic device default or as an explicit file used by the VoIP app.
Using a Bria softphone, set up the account as usual and then select “Account Advanced” (under the heading Account Extras). Scroll down to the section entitled “Transport and Security” and tap on the SIP Transport setting which opens a set of radio buttons offering UDP, TCP, TLS and Auto. Select TLS. If you are using self-signed rather than commercial certificates on the server, you will almost certainly need to un-tick the option “Verify TLS Cert” which is in the TLS Cert Management section.
I found it more difficult setting up a Zoiper softphone, although the situation was confused because there was a curious lack of persistence on the ‘Disable certificate verification’ option. I recommend that you completely exit the Zoiper app then re-launch it after setting up an account because some settings may change through a restart.
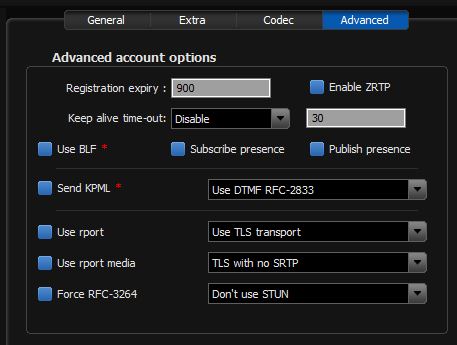
Most of the relevant settings for the Zoiper softphone are found under the Accounts tab on the main “Preferences” form; select the account – or create a new one – and insert the usual settings for Domain, Username and Password on the ‘General’ tab. On the ‘Advanced’ tab of the user account, select “Use TLS transport” from the relevant drop-down and select the “Don’t use” option in the section called “TLS client certificate”.
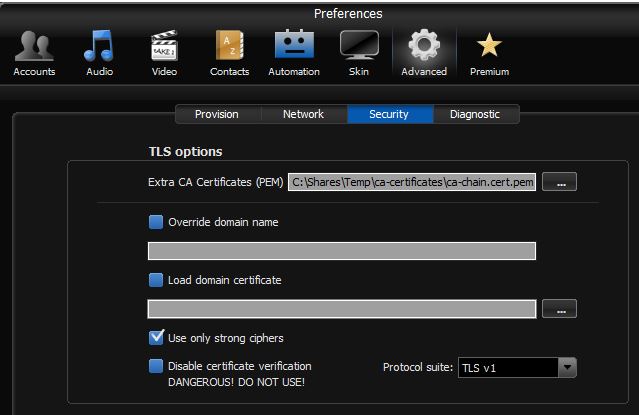
You’re not done yet. Now click on the cog symbol at the top of the preferences form to get to the global ‘Advanced’ settings and in that select the “Security” tab. I found it necessary to copy the CA certificate (or certificate chain) to my device and then insert the path to this file in the box labelled “Extra CA Certificates (PEM)”. I also set Protocol suite to TLS v1 rather than SSL v2/3 and ticked the box ‘Use only strong ciphers’.
Testing it on an old Snom 360 phone with v7 firmware, the simplest way to make it use TLS was by adding the transport parameter to the end of the registrar address (or you can use the Outbound Proxy box too). I was testing on a LAN and set the Outbound Proxy as follows:
192.168.0.111;transport=tls
Please note that newer Snom phones may have stricter rules for TLS connections and verification of certificates etc.
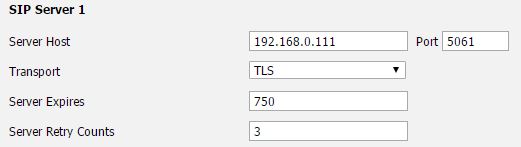
On the Yealink T21P phone, there is a drop-down selector for “Transport” on the main account form. Set this to TLS. On the same form, set the Server Host port to 5061 or whatever port number you set on the server.
Next, go to the Security tab and select “Trusted Certificates” from the navigation panel on the left. When using self-signed certificates, I always set this as follows:
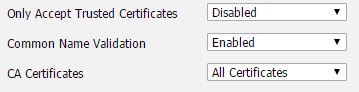
If you are using commercial server certificates, it should be possible to enable the option to only accept trusted certificates.
On my T21P E2 model, it was also necessary to change a setting under the Security tab in the section “Server Certificates”. Based on the description given on the Yealink data entry form, it doesn’t make a lot of sense. However, purely from trial-and-error I found it necessary to change the drop-down box labelled “Device Certificates” to Custom Certificates as shown below. This was not necessary on an older T26 handset running older firmware.